

Industrial floor joint filling works best when the filler suits the joint’s movement and traffic demands, and the joint is clean, dry, and prepared to the right depth. For control joints, install filler at least 1 inch deep; saw-cut control joints are filled full depth.
It’s easy to focus on the epoxy or polyurea and overlook preparation. Yet debris, incorrect depth, or spilled filler can compromise the joint and stain nearby concrete.
This guide covers how to compare epoxy and polyurea, prepare and clean a joint, and apply filler at the right pace. You’ll also learn how to control fill depth and protect adjacent concrete before work begins.
Key Takeaways
- Choose epoxy or polyurea based on the joint’s movement and the floor’s traffic demands, not just the product name.
- Prepare the joint by removing debris and residue so the filler can bond to clean concrete.
- Follow the filler’s mixing instructions carefully, then apply it at a depth suited to the joint type.
- Plan the work around slab movement and the filler’s working time to help avoid rushed or uneven application.
- Protect nearby concrete before filling, and clean up drips promptly to reduce the risk of visible stains.
Epoxy and polyurea filler comparison
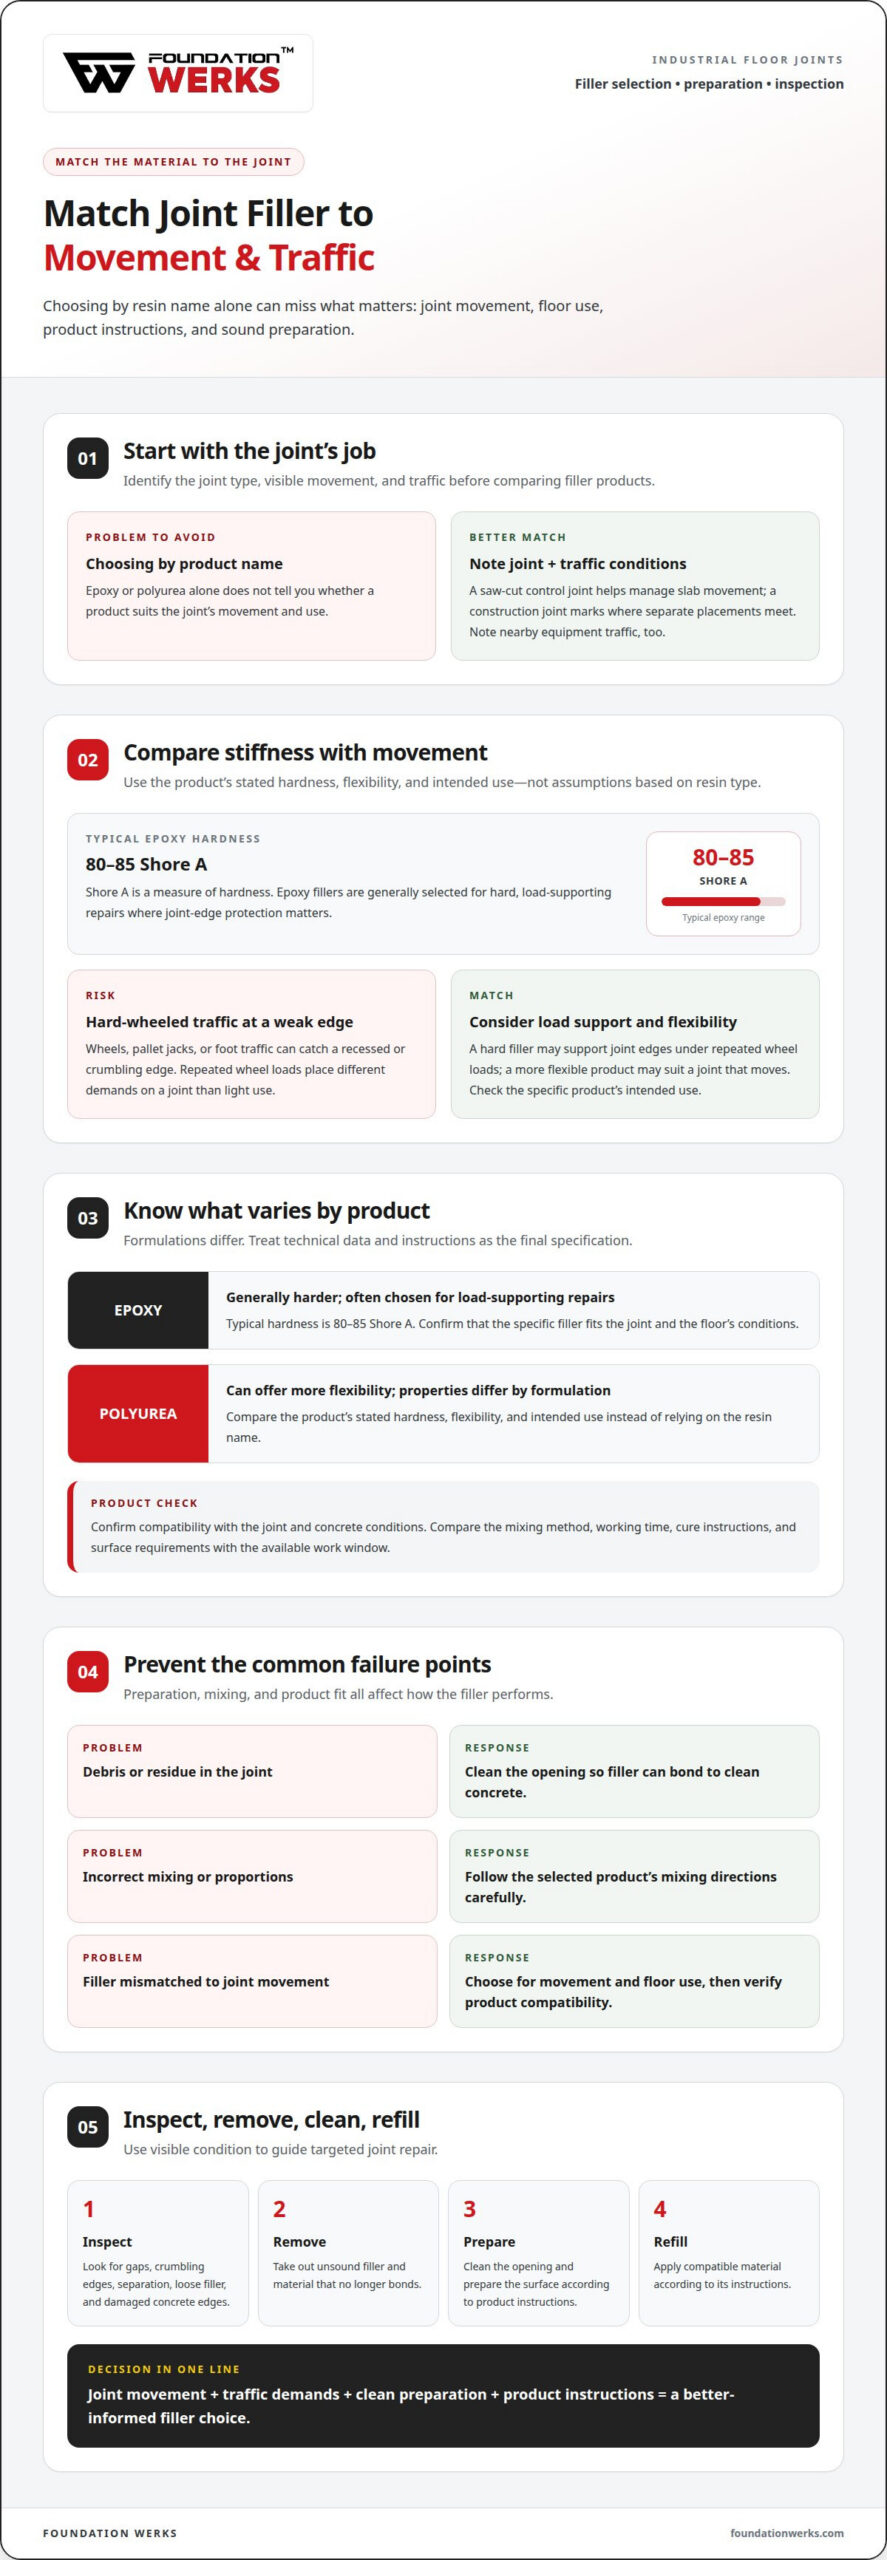
Choose a filler by matching its stiffness to joint movement and floor traffic. Epoxy joint fillers are typically 80-85 Shore A durometer, a measure of hardness. Polyurea products vary by formulation, so compare each product’s stated hardness, flexibility, and intended use rather than relying on the resin name alone.
Joint filler can fail because of poor surface preparation, incorrect mixing, or a mismatch between the filler and the joint’s movement. Reduce these risks by cleaning the joint, following the mixing directions, and choosing a product suited to the floor’s use.
Inspect filled joints during routine floor checks for gaps, crumbling edges, or loose material. To repair a joint, remove unsound filler, clean the opening, and apply compatible material according to its instructions.
- Identify the joint’s job. A saw-cut control joint helps manage slab movement, while a construction joint marks where separate placements meet. Note the joint type, visible movement, and nearby equipment traffic before comparing fillers. A forklift aisle and a lightly used storage area may place different demands on the repair.
- Compare stiffness and movement needs. Epoxy fillers are generally selected for hard, load-supporting repairs where edge protection matters. Their typical 80-85 Shore A hardness helps explain why they suit joints exposed to hard-wheeled traffic. Polyurea formulations can offer more flexibility, but product properties differ. Use the technical data for the specific formulation.
- Match the filler to the floor’s traffic. Consider whether wheels, pallet jacks, or foot traffic cross the joint, and whether they can catch a recessed or crumbling edge. A hard filler may support joint edges under repeated wheel loads, while a more flexible product may suit a joint that moves. The product’s intended-use statement should guide this choice.
- Check compatibility before application. Confirm that the selected filler is intended for the joint and concrete conditions involved. Compare its mixing method, working time, and cure instructions with the available work window. For example, a product requiring careful two-part mixing needs a different setup from a cartridge-applied product.
- Use the product instructions as the final specification. Don’t assume that every epoxy or polyurea shares the same hardness, mixing ratio, or cure schedule. Follow the manufacturer’s requirements for surface condition and application. A formulation designed for one joint may not suit another, even when both floors are concrete.
- Plan inspection and repair around visible condition. Look for separation from the joint wall, loose filler, and damaged concrete edges. Mark affected locations, remove material that no longer bonds, then prepare and refill those areas with a compatible product. This targeted approach helps distinguish a localized filler issue from broader concrete damage.
Filler mixing and application
Follow the filler’s instructions for equipment and temperature conditions before mixing. The U.S. Environmental Protection Agency identifies working concrete saws, sand-blasting equipment, compressors, air nozzles, and accessory tools for joint-sealing work.
Select Equipment and Installation Temperatures
Gather the tools required for your chosen filler and check its application temperature range. Compare that range with the air and concrete temperatures at the joint, and do not apply the material outside the product’s limits. Use suitable saws and cleaning equipment to prepare the joint, with a compressor and air nozzle ready to clear loose debris.
Mix and Apply the Filler
Follow the product instructions for the mixing method and proportions. For two-part epoxy, combine equal amounts of resin and hardener; for rigid repairs, instructions recommend starting with a 5:1 sand-to-epoxy ratio. Cartridge products need their own preparation: shake the cartridge for 1-2 minutes when its instructions call for it, then apply with the specified dispensing equipment.
- Set up a controlled mixing area. Arrange the components, graduated cups, paddles, and application tools before opening the filler. A kit that includes three graduated mixing cups and three paddles provides separate equipment for measuring and blending. Keep the joint accessible, and avoid preparing more material than you can place within the product’s working time.
- Measure each component accurately. For a two-part product, use equal amounts of resin and hardener when its instructions specify that ratio. Add sand only when the product calls for it, and begin with the recommended 5:1 sand-to-epoxy ratio for rigid repairs. Don’t estimate by eye; uneven proportions can leave uncured or weak material.
- Blend until the mixture is consistent. Scrape the cup sides and bottom as you mix, so unmixed material doesn’t remain at the edges. For a cartridge, shake it for 1-2 minutes if directed, then fit the specified nozzle. A 22-ounce cartridge is one available format, but match the dispenser to the actual package.
- Fill steadily and monitor the surface. Apply material along the joint without stopping unnecessarily, keeping the nozzle positioned to limit trapped air. Work in manageable sections, and watch for gaps or low spots as the filler moves into place. Remove excess while it is still workable, following the product’s cleanup directions.
- Respect the cure instructions. Keep traffic and cleaning equipment off the filled joint until the product allows use. Cure conditions depend on the chosen filler and application environment, so use its stated schedule rather than a general estimate. Check the finished surface before reopening the floor.
Joint preparation and cleaning
Prepare the joint in order: inspect it, remove unsound material, then clear the surface before filling.
- Inspect and mark the repair area. Follow the joint from end to end and note loose edges, old filler, cracks, and visible contamination. Mark sections that need extra preparation, such as a spot where a saw-cut edge has broken away. Distinguish a narrow crack from an established joint, since the required preparation can differ.
- Remove old filler and loose concrete. Use suitable tools to clear material that could block the new filler from bonding to concrete. Work along both joint walls, not just the top opening. Avoid leaving thin flakes or crumbs behind. The U.S. Environmental Protection Agency identifies working concrete saws, sand-blasting equipment, compressors, air nozzles, and accessory tools for joint-sealing work.
- Chase narrow cracks to the required profile. For cracks narrower than 1/4 inch, chase them to at least 1/4 inch wide and 1/2 inch deep. This creates space for repair material rather than leaving a thin surface layer. Keep the cut consistent along the crack, and avoid widening sound concrete unnecessarily.
- Clean out dust after chasing or shaving. Shaving and sawing can leave fine concrete dust, chips, and loose fragments inside the joint. Remove this residue with an air nozzle, compressor, or other suitable cleaning tool. Check the bottom and sidewalls, where particles can settle out of sight. If debris remains, repeat the cleaning pass before moving on.
- Clear residue without spreading it across the slab. Collect removed filler, dust, and concrete chips as you work. Use a vacuum or suitable cleanup method to lift debris from the floor instead of pushing it into nearby joints. For example, clean a chased crack before sweeping the surrounding aisle, so loose particles don’t fall back into the prepared opening.
- Check the joint before filling. Inspect the prepared opening for remaining dust, standing water, oil, and loose edges. Remove any visible contaminant and let the joint meet the filler’s required surface condition before application. A final pass with an air nozzle can reveal particles hidden along the walls. Keep foot traffic and equipment away until the joint is ready.
Joint-filling depth and timing
Set the fill depth by joint type, then schedule placement to account for slab shrinkage. ACI and PCA guidance covers control-joint depth, while ACI 302 addresses timing after new slab placement.
For standards references, the U.S. Environmental Protection Agency lists ACI 504R-90, Guide to Joint Sealants for Concrete Structures. The cost per linear foot depends on joint dimensions, preparation, filler selection, and site access; pricing is provided after a quote request.
- Identify the joint before setting depth. Check whether the opening is a saw-cut control joint or another joint type. The page cites ACI and PCA guidelines recommending full-depth filler in saw-cut control joints. Don’t apply that approach automatically to every opening; joint design and the filler’s instructions guide the installation.
- Measure the joint’s depth. For a joint deeper than 2 inches, the cited ACI and PCA guidance calls for a minimum 2-inch filler depth. Measure from the floor surface and record the usable depth along the run. A consistent check helps identify sections that need different preparation or material quantities.
- Set control-joint fill depth. Install control-joint filler at least 1 inch deep. The page cites ACI and PCA guidelines recommending full-depth filler in saw-cut control joints. These directions address different depth descriptions, so identify the joint and its actual depth before deciding how much material to place.
- Prepare narrow cracks to receive filler. If a crack is narrower than 1/4 inch, chase it to at least 1/4 inch wide and 1/2 inch deep. This dimension applies to crack preparation, not a substitute for control-joint depth recommendations. Keep the opening consistent so the filler has room to form a useful repair.
- Schedule work after slab placement. ACI 302 is cited for installing joint filler as late as possible, 60-90 days after new slab placement. This timing allows slab shrinkage before filling. Coordinate the work with floor access and production needs, while following the chosen filler’s application and cure instructions.
- Check the complete run before application. Compare measured depth with the selected joint recommendation and product instructions. Note transitions, deeper sections, or changes in joint type. For example, a saw-cut control joint and an adjacent construction joint may require different treatment, even within the same warehouse floor.
- Record the installation details. Note the joint type, measured depth, filler product, and placement date. These details help maintenance teams assess a later gap or damaged edge. If a section needs repair, the record shows how the original depth and timing were selected.
Protecting adjacent concrete from filler stains
Before filling, protect the slab along both edges of the joint. Even a small spill can spread on shoes, wheels, or cleaning equipment and mark nearby concrete.
- Choose the protection method. Use masking tape or another surface covering compatible with the concrete and filler. Keep the joint opening fully exposed. For example, place tape parallel to both edges, leaving enough room to tool the filler without touching the protected slab.
- Cover vulnerable nearby surfaces. Protect polished concrete, painted markings, thresholds, and floor drains before opening the filler. A spill near a drain can travel beyond the work area. Secure coverings so they won’t lift when a worker moves a dispensing hose or steps across the floor.
- Set up a clean work zone. Place mixing containers, cartridges, and tools on a protected surface beside the joint. Keep lids and packaging away from forklift paths. A defined staging area reduces the chance of a dropped paddle or leaking container marking concrete outside the repair zone.
- Control the application path. Keep the nozzle or applicator centered over the joint and move at a steady pace. Avoid sudden starts that can release excess material. On a long warehouse joint, work in manageable sections and watch the edges as filler reaches each transition.
- Keep cleanup materials within reach. Set out the cleanup items named in the filler instructions before application begins. Don’t wait until a spill occurs to locate them. A ready setup lets the crew respond while the material remains workable, rather than leaving a drip to cure on the slab.
- Address drips promptly and carefully. Follow the product’s cleanup directions for uncured filler. Use the recommended tool to lift or wipe excess without spreading it across the concrete. Avoid improvised cleaners, which may discolor the slab or affect the filler at the joint edge.
- Remove tape at the right point. Follow the filler manufacturer’s timing instructions for removing masking. Pull tape away from the joint carefully, rather than dragging it across fresh material. If filler has bridged onto the tape, separate it cleanly to avoid tearing the joint’s finished edge.
- Inspect the slab after application. Check both sides of the joint, nearby markings, and the path between work sections. Look for smears, drips, or displaced coverings. Address any residue using the product’s cleanup directions, and keep traffic away while the filled joint cures.
- Prepare for larger repair areas. If damaged joints extend across a commercial floor, a planned commercial concrete joint repair can address the joint condition and surrounding concrete as part of the repair scope.
Foundation Werks: Polyurethane Concrete Raising
Foundation Werks provides Polyurethane Concrete Raising for commercial concrete that has settled or lost support. When joint damage occurs alongside uneven slabs or voids beneath the concrete, replacing the filler alone may not address the underlying issue. Polyurethane Concrete Raising can lift and stabilize settled concrete, while Commercial Concrete Crack and Joint Repairs address damaged joints and cracks.
Consider the broader repair when joint problems occur alongside slab settlement, uneven floor sections, or signs of unsupported concrete. Concrete Replacement may suit concrete that needs replacement. The appropriate service depends on the slab’s condition and the cause of the damage.
Contact Foundation Werks to discuss your commercial concrete and identify a practical next step.
Plan the next step for your floor
A filled joint is only one part of a working concrete floor. If nearby slabs are uneven, unsupported, or damaged, consider the overall condition before deciding what to repair. That context helps you determine whether industrial floor joint filling is sufficient or part of a broader repair.
Foundation Werks offers Commercial Concrete Crack and Joint Repairs for damaged joints, Polyurethane Concrete Raising for settled concrete, and Concrete Replacement when replacement is needed. The best approach depends on the floor’s condition and the surrounding slab. Assessing both helps connect the visible joint problem with the concrete around it.
Describe what you’re seeing on your commercial floor to Foundation Werks and discuss a practical next step.
A measured plan helps you move forward with greater confidence in your floor’s repair.
Frequently Asked Questions
What materials are used for industrial floor joint filling?
Epoxy and polyurea are commonly used to fill industrial concrete floor joints. Epoxy systems use resin and hardener, while polyurea fillers vary by formulation. Choose a material suited to the joint’s purpose and expected floor use. For example, a joint crossed by hard-wheeled equipment may need different edge support from one in a low-traffic area. Follow the selected product’s instructions.
How do you choose between semi-rigid epoxy and polyurea joint fillers?
Choose a filler by comparing the support the joint needs with the movement it must accommodate. Semi-rigid epoxy can support joint edges under traffic, while polyurea properties vary by formulation. Compare product information for hardness, flexibility, intended use, and application requirements. Consider whether loaded carts regularly cross the joint and whether the slab joint is expected to move.
How wide and deep should industrial floor joints be filled?
Depth depends on the joint type: saw-cut control joints are filled full depth, while control-joint filler should be at least 1 inch deep. For joints deeper than 2 inches, cited ACI and PCA guidance recommends a minimum 2-inch fill depth. These are not interchangeable instructions. A crack narrower than 1/4 inch should be chased to at least 1/4 inch wide and 1/2 inch deep before filling.
How do you prepare and fill joints in a concrete industrial floor?
Remove unsound filler and concrete, then clear dust and debris from the joint. Confirm the opening meets the selected product’s surface requirements. Measure and mix components as directed, then fill steadily while watching for gaps or excess. Protect the surrounding slab, and keep equipment and foot traffic away until the filler’s instructions say the floor can be used again.
When should saw-cut joints be filled after concrete placement?
ACI 302 is cited for filling joints as late as possible, 60-90 days after new slab placement, allowing time for slab shrinkage. That timing applies to the installation decision, not the filler’s cure period. Plan the work around floor access and the selected product’s application directions. Before filling, confirm the joint is ready for the material and that the work area can remain clear during curing.