

A sunken slab can often return to use sooner than you might expect. In the polyurethane slab lifting process, technicians inject expanding, two-part foam beneath the concrete and guide the lift with laser levels. Most lifted slabs are usable within one hour, though the work itself requires careful, controlled adjustments.
It’s reasonable to want to know when you can walk or drive across the repaired area and what happens first. Technicians inject foam beneath the slab, where it expands to fill voids and raise the concrete. Laser readings help them monitor the slab’s position as they level it.
This article walks through the process, from drilling injection holes to checking the final elevation. You’ll learn how technicians place and expand the foam, use laser levels to guide the lift, and assess the slab and surrounding conditions. It also explains when the repaired surface can be used.
Key Takeaways
- See how foam lifting can be applied to concrete in settings such as warehouses, roads, airports, and car parks.
- Learn how small injection holes let technicians place expanding foam beneath a sunken slab.
- Understand how a two-part foam lifts the concrete by expanding into space below it.
- Find out how laser levels help guide adjustments toward the intended slab height.
- Most lifted slabs are usable within one hour, though the process still requires careful monitoring.
Why Use Polyurethane for Concrete Slab Lifting?
Polyurethane foam can lift uneven concrete without removing the entire slab. As it expands, it fills space beneath the concrete and supports targeted repairs. The process can help restore access to areas such as warehouse floors and commercial slabs. The polyurethane slab lifting process depends on the slab’s condition and the space beneath it.
Applications include warehouse floors, roads, airport pavements, and car parks. Each setting has different demands. A warehouse floor may need a level surface for equipment and stored goods. Roads and airport pavements require attention to traffic movement and adjoining slabs. In a car park, the plan should account for nearby concrete, drainage paths, and access during the work.
- Warehouses: Lifting can address settled floor areas while limiting disruption to nearby operations.
- Roads: Targeted injection can raise settled sections without replacing the full stretch of pavement.
- Airports: Pavement repairs require careful planning around adjacent surfaces and site access.
- Car parks: Raising a sunken panel can help restore a more even transition with neighboring concrete.
Indoor work needs attention to ventilation and material handling. Polyurethane foam generates heat as it cures, so indoor application should use proper ventilation and mixing ratios. In a warehouse, the work plan should account for the enclosed space and nearby activity. Technicians also control injection and monitor the slab, rather than treating each hole as an isolated step.
Soil conditions below a slab can affect its support. Injection may need to address voids or weak areas beneath the concrete, not just the visible surface. Soil composition, drainage, and access to the work area all influence the repair approach. Deep-soil stabilization differs from lifting a shallow slab, so the injection plan should suit the conditions below.
Permit and building-code requirements depend on local jurisdiction and project scope; there is no single rule for every slab-lifting job nationwide. Requirements for a road, airport, or private car park may differ from those for an interior floor.
Cost depends on factors such as the slab’s area and condition, access, the amount of lifting needed, and the voids beneath it. A settled panel with limited access can require a different scope from a broad warehouse floor repair.
Service life depends partly on base soil condition, drainage patterns, and whether injection fully fills the voids. Warranty coverage and duration vary by contractor and written terms, so there is no single typical warranty period to expect.
When reviewing a repair plan, look for a clear explanation of the slab assessment, injection approach, elevation checks, and project scope. The plan should distinguish between lifting settled concrete and addressing cracks or joints that need separate repair.
Polyurethane resin injection beneath sunken concrete slabs
Polyurethane slab lifting raises concrete by injecting expanding foam into the space beneath it. The work combines planned hole placement, controlled injection, and monitoring the slab’s movement.
High-Density Lifting Foam
High-density polyurethane foam is used in concrete lifting where the material must support the slab after expansion. The product’s stated properties need to match the project conditions, including the slab’s use, the supporting soil, and the voids beneath the concrete. A warehouse floor, for example, has different demands from a lightly used walkway.
Density alone doesn’t explain whether a foam suits a particular repair. The injection plan also needs to address how far the material must travel and where support is needed. Technicians assess the slab and underlying conditions, then select a foam and placement approach for the repair rather than relying on the product label alone.
Drilling Injection Holes
Technicians drill access holes through the concrete slab so they can inject foam beneath it. Polyurethane foam lifting typically uses holes around ⅝ inches wide. Their location depends on the sunken area and the spaces that need filling, such as beneath a settled panel near a joint.
Hole placement determines how the foam reaches the voids. Technicians plan locations in relation to the slab’s edges, cracks, and low areas, then inject through the openings to support the concrete. They patch the holes when the injection work is complete.
The injection sequence matters. Technicians work through the planned openings and monitor the slab as foam expands below it. If a low area begins to rise, they can adjust where they place more material. The aim is to support the concrete and bring its surface closer to the intended level, not to inject the same amount through every hole.
Concrete condition also affects the approach. A sound slab with a localized void presents a different task from cracked concrete with several uneven sections. Technicians account for cracks and joints when planning injection points, addressing the support beneath the slab without treating surface damage as though it were only a void.
Soil and drainage affect the space beneath the concrete. If water has changed the supporting soil, filling a visible gap alone may not address the conditions that contributed to settlement. The repair plan considers the soil, drainage patterns, and voids beneath the slab. These factors help explain why two slabs of similar size can need different injection plans.
Once injection is complete, the openings are closed and the work area is reviewed. For an uneven concrete panel, that review considers how the raised section meets adjacent slabs and joints. A suitable injection plan connects the foam choice, hole locations, and observed slab movement into one coordinated repair. Explore polyurethane concrete raising for sunken concrete that needs targeted support.
Two-part foam injection and expansion
Injection equipment delivers foam beneath the slab through prepared access points. Utility scanning, controlled mixing, and careful placement help technicians direct the expanding material where support is needed.
Two-Part Foam Expansion
Polyjacking uses a two-part polyurethane foam that expands beneath the concrete slab. The components combine during injection; the expanding foam then fills space below the concrete and raises it. Technicians control placement through planned access points while observing how the slab responds.
The amount and location of injection matter. For example, a low corner may need material beneath that area, while a longer settled edge calls for a different distribution. The foam is lightweight, but the repair still depends on placing it where the slab needs support, rather than simply filling every accessible space.
Lifting Equipment and Materials
The main materials and equipment include two-part polyurethane foam, an injection unit, delivery hoses, and a fitting or lance that guides the material through an access point. The setup combines the components and delivers the foam beneath the slab.
Equipment must suit the material and planned injection points. Technicians use it to control delivery, observe the slab’s response, and adjust placement as work progresses. They manage the injection rate and foam expansion together.
Before drilling, technicians identify buried utilities near the work area. Utility scanning helps locate lines that could be affected by drilling or injection. This matters beside a building, near a service entrance, or across a paved area with buried connections. Marked utility paths inform where access points can go and how the injection plan proceeds.
Scanning helps identify clear drilling paths and areas that need a different approach. Technicians use the findings to plan hole locations around identified utilities, then align injection equipment with those access points. For a slab near a building wall, this planning helps avoid routing a hose or lance across a marked service path.
A grout injection lance is a delivery tube used to place material through an access point and into a space below the slab. For polyurethane foam work, the fitting and delivery method must suit the injection equipment and material. A lance gives technicians access to the intended area beneath the concrete, including where surface access is limited.
Grout and polyurethane foam are different materials, so a grout lance should not be assumed to suit every foam setup. The technician matches the delivery tool to the material and injection method. A lance that reaches a void beneath a slab edge, for example, can support targeted placement while the injection unit controls delivery.
After injecting the foam, technicians watch for movement and adjust placement as needed. The process connects utility scanning, access locations, equipment setup, and the slab’s response. This coordination directs expanding material beneath the intended area rather than treating injection as a one-step fill.
Precision control using laser levels
A laser level gives technicians a consistent reference for tracking slab height during lifting. They compare readings across the work area and use them to guide adjustments as the concrete moves.
Before injection begins, technicians establish reference points on the slab and nearby concrete. For a sunken walkway beside a doorway, they can compare the settled section with the threshold and adjoining panels. Those readings help define the intended position and show where the surface changes height. Reference points also help distinguish a low spot from a broader slope.
During lifting, technicians check the laser reference as the foam expands. If one edge rises faster than another, they can pause and adjust injection locations instead of continuing at the same pace. This measured method helps limit uneven movement and keeps attention on how the entire panel responds, not just the point nearest an injection hole.
- Set a baseline: Record reference readings across the low area and its adjoining edges.
- Track movement: Recheck the same positions as the slab begins to lift.
- Adjust placement: Use the readings to guide the next injection point or pause.
- Review transitions: Compare the finished panel with nearby concrete and thresholds.
Position matters when taking readings. A technician needs a clear line of sight between the laser and the measuring point. For a car park panel, parked vehicles or equipment may obstruct that view, so the work area should allow readings at relevant slab edges and low sections. Consistent reference points make readings comparable.
The target is not simply to make every point match. A driveway, warehouse floor, and walkway meet different surrounding surfaces and may need different transitions. Lifting a panel beside a garage entrance, for example, requires attention to the doorway and adjacent concrete. The laser provides height information; the technician interprets it in light of the site layout and repair goal.
Laser readings also help technicians decide when to stop lifting. As the slab approaches its intended position, they can make smaller adjustments and reassess the surrounding surface. Visual checks still matter, especially at joints and slab edges, where a height difference can remain noticeable even when the center looks level.
After injection, technicians can compare final readings with the starting reference points. This review shows how the panel’s position changed and whether its transitions align with nearby concrete. Using a laser level throughout the lift makes elevation checks repeatable rather than relying on appearance alone.
Slab lifting and leveling process
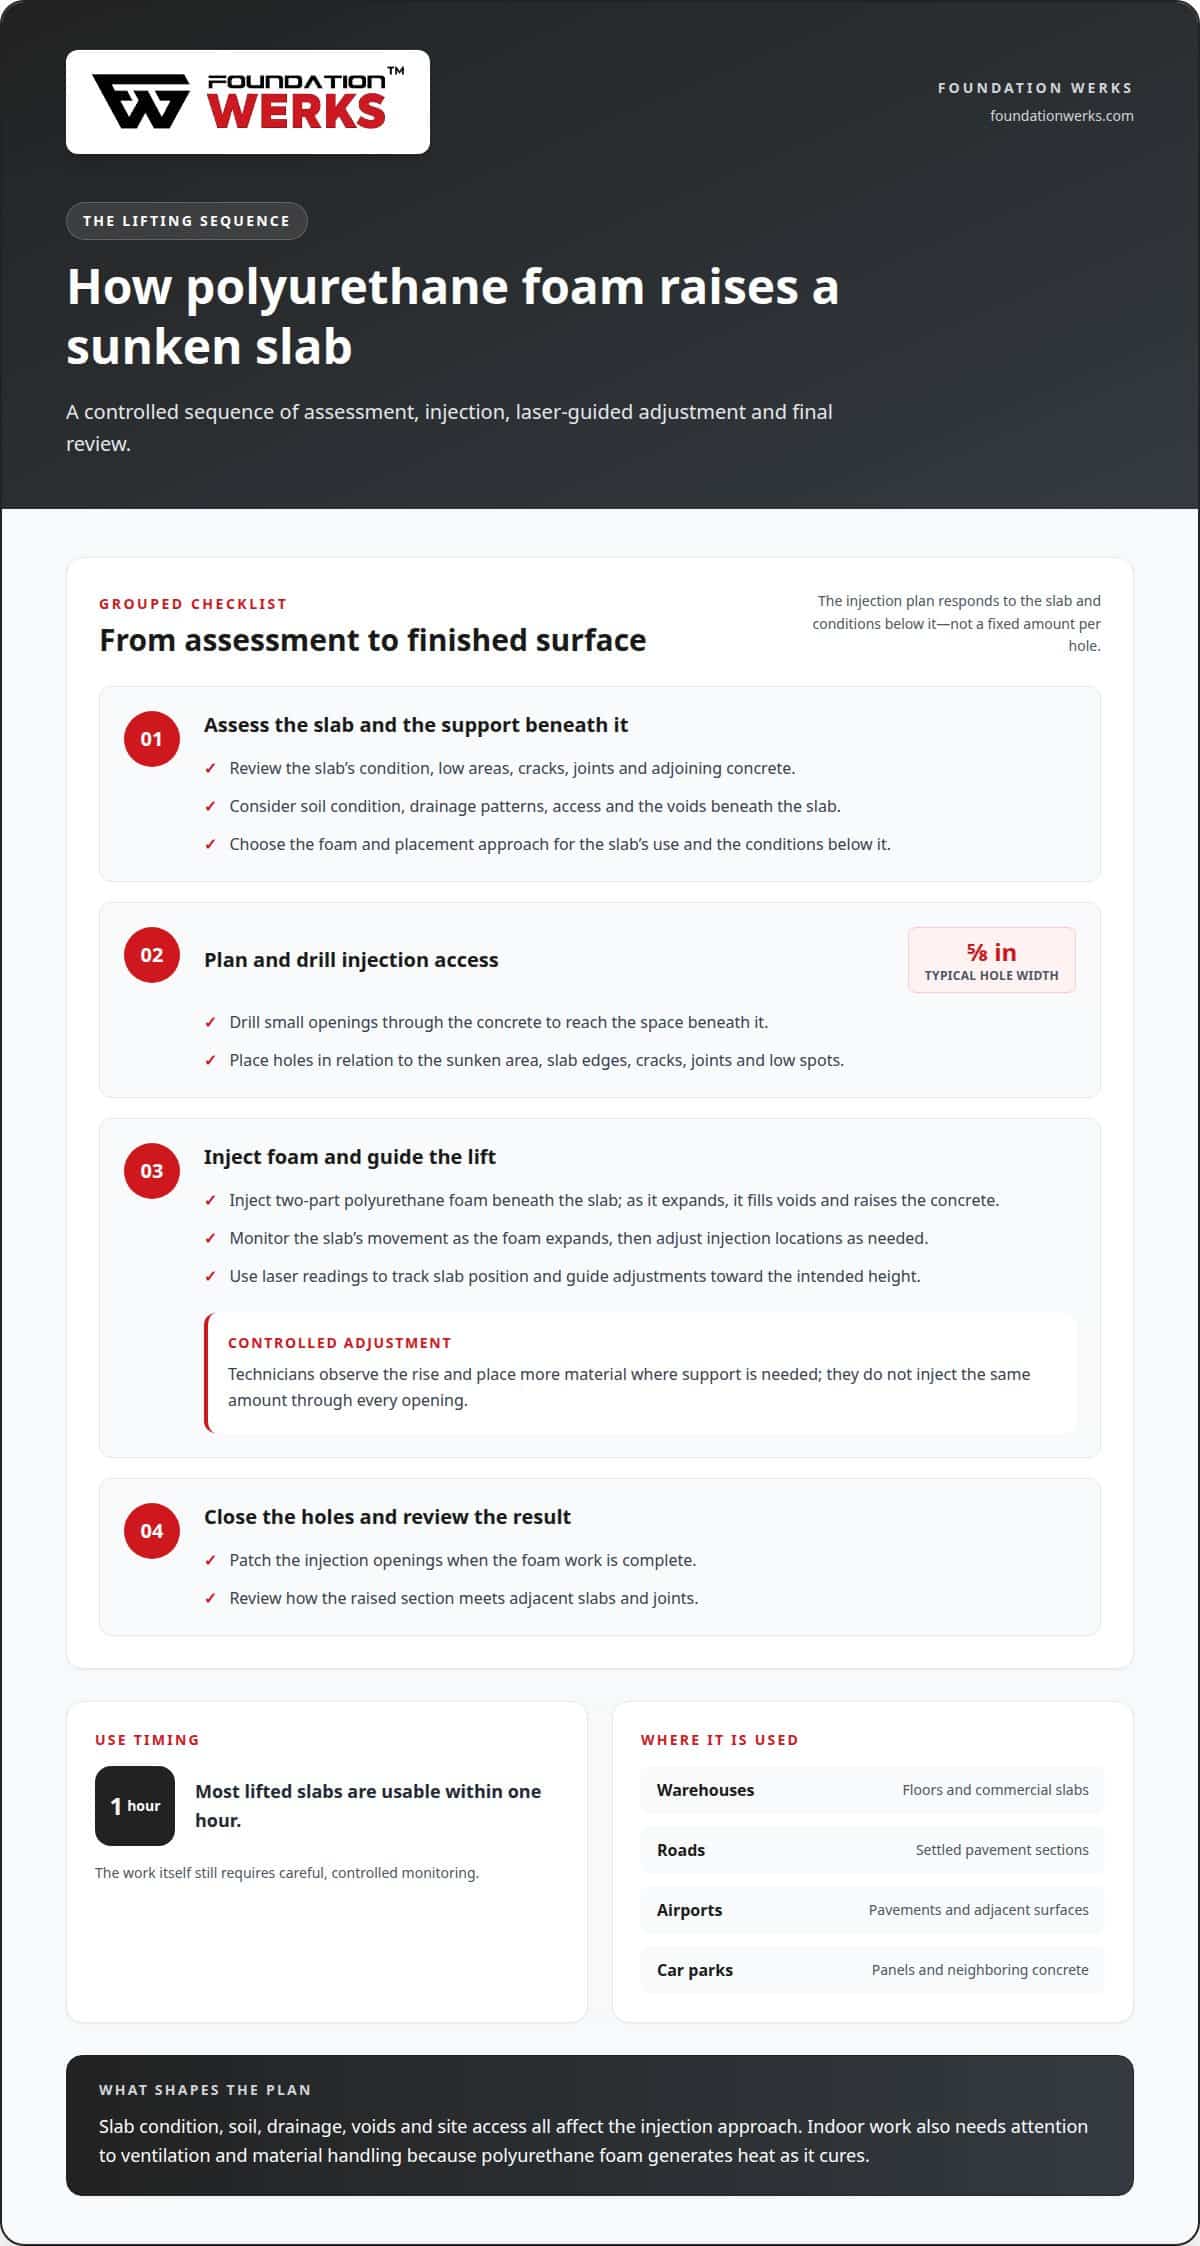
Polyurethane lifting follows a controlled sequence: assess the slab, plan injection points, raise the concrete, and review the finished surface. Each step connects the slab’s movement with the support needed beneath it.
In practice, technicians assess the settled area, drill access holes, and inject foam beneath the slab. They monitor the lift, adjust placement, patch the holes, and review how the repaired section meets nearby concrete.
- Assess the slab and site. Technicians examine the concrete slab, its joints, cracks, and adjoining surfaces. A sunken patio panel beside a doorway, for example, needs a lift that accounts for the threshold and the adjacent panel. They also consider where voids or weak support may sit below the surface.
- Plan the injection. The team selects access points based on the low areas and the support needed underneath. The plan accounts for the slab’s shape and surrounding features, such as a wall or drain. This helps direct material toward the intended space rather than relying on uniform injection.
- Inject and monitor. Technicians introduce polyurethane foam beneath the concrete and watch the slab respond. As the material expands, they assess its position and adjust placement as needed. For a panel that rises unevenly, they can pause and reassess before continuing at another point.
- Check the finished level. After lifting, technicians review the surface, edges, and transitions to adjacent concrete. A walkway panel should meet nearby slabs without leaving an abrupt step. Injection holes are then closed, and the work area is reviewed.
The key is controlled movement, not raising the lowest point as quickly as possible. Lifting one corner of a driveway panel without monitoring the opposite edge, for example, could leave an uneven transition. Technicians use observations and elevation readings to guide adjustments and compare the result with the intended position.
Timing also matters after injection. Most polyurethane foam products used for polyjacking reach an initial cure within one hour of injection, and most lifted concrete slabs are usable within one hour. The team’s instructions for the specific work area should guide when people or vehicles return.
Not every slab is suited to lifting. Concrete that is badly broken, missing sections, or unable to move as a stable piece may need a different repair approach, such as replacement. The practical takeaway is to assess the slab’s condition first, then match the repair method to whether the concrete can be lifted and supported.
Foundation Werks: Polyurethane Concrete Raising
Foundation Werks provides polyurethane concrete raising for sunken slabs that can be lifted and supported from beneath. This service can suit a settled walkway, car park, or warehouse floor when the concrete is suitable for lifting. The repair plan considers the slab’s condition and the support needed below it.
For cracked or damaged areas, the right approach may differ. Foundation Werks also provides commercial concrete crack and joint repairs, concrete lifting, and concrete replacement. The work depends on whether the slab can be raised or needs another form of repair.
If a concrete slab has settled or become uneven, contact Foundation Werks for a clear assessment and a free estimate.
Choose a Practical Next Step for Your Slab
Start with the area that affects everyday use. A raised walkway edge, a settled warehouse floor, or a slab that no longer meets a doorway each presents a different practical concern. Identify the outcome you need, such as a smoother transition, better access, or a more usable surface.
That goal makes a discussion about the polyurethane slab lifting process more specific. Note where the concrete has changed and what it meets at its edges. Consider how the area is used, whether by foot traffic, vehicles, or equipment. These details help frame the repair discussion without assuming every crack or low spot needs the same approach.
Foundation Werks can discuss the slab’s condition and a suitable path forward. If lifting isn’t right for damaged concrete, a different repair direction may be needed. A clear description of the affected area gives the conversation a useful starting point.
A considered next step can help you move toward a concrete surface that better suits the space.
Frequently Asked Questions
Can I drive or walk on the concrete the same day?
Yes. The surface may be usable once curing is complete, but timing can vary. For a driveway, this can help you plan vehicle access without expecting an overnight closure. On a commercial site in Dallas, coordinate access around the active work area and follow the crew’s instructions for nearby slabs and traffic.
What Is Foam Leveling and How Does It Work?
Foam leveling raises settled concrete by injecting expanding polyurethane beneath the slab. The material fills spaces below the surface and lifts the concrete as it expands. A sunken patio panel, for example, can be raised by addressing the support beneath it. Visible cracks or joint damage may need separate attention.
Where Can it be Used?
Polyurethane foam lifting can be used on driveways, sidewalks, patios, pool decks, and warehouse floors. It also suits commercial slabs and void stabilization. Projects may include raising a settled sidewalk panel or leveling an uneven warehouse floor. Foundation Werks serves Dallas and nearby communities, including Frisco, McKinney, Prosper, Allen, Fairview, Southlake, Irving, North Dallas, and DFW.
How large are the injection holes for polyurethane slab lifting?
Injection holes are typically about ⅝ inches wide. Technicians place them where access is needed to deliver foam beneath the settled section. For a driveway panel, the locations depend on the low area and the support required below it. After injection, the holes are patched. Their small size helps keep the surface patchwork limited compared with larger access openings.
How long does polyurethane foam take to cure before the slab can be used?
Allow the foam time to cure before using the repaired surface. That means a homeowner can plan to return to a driveway or walkway the same day. On commercial concrete, access planning still matters while technicians work. Keep people and vehicles clear of the active area until the work and cure are complete.
What are the risks or limitations of polyurethane slab lifting?
Results depend partly on the base soil, drainage, and whether the injection fills the voids beneath the slab. Polyurethane foam also generates heat as it cures, so indoor work calls for proper ventilation and mixing ratios. Injection placement needs care because expansion can move concrete. An assessment considers the slab’s condition and surrounding surfaces before the repair approach is selected.
Which concrete slabs can and cannot be lifted with polyurethane foam?
Driveways, sidewalks, patios, pool decks, and commercial floors are examples of solid concrete surfaces that can be considered for lifting. Whether a particular slab can be raised depends on its condition and the support needed beneath it. An assessment helps determine the appropriate lifting and repair approach.
Polyurethane slab lifting vs. mudjacking: cost, durability, and pros and cons
Polyurethane foam lifting is more expensive than mudjacking, but it can raise targeted areas without removing the entire slab, and most repaired slabs are usable within one hour. Its longevity depends partly on base soil, drainage, and whether the voids are fully filled.